Enable port forwarding for the Linksys WRT600N

1 Linksys router WRT600N presents itself to your local network with the IP 192.168.1.1. Open your browser and type this IP address in the address bar
2 The login screen will be presented. Type the Username and Password. For default values please refer to your router documentation
3 Click "Log in" button

4 The router user interface page loads, the main menu is located at the top. Click "Applications & Gaming" tab

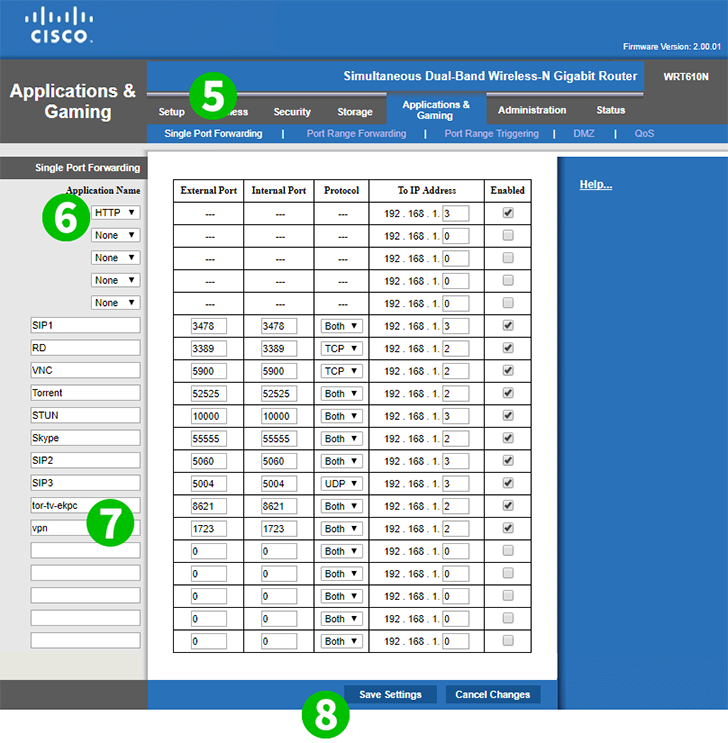
5 "Single port forwarding" tab is loaded by default. This is where you need to specify which ports you want to be forwarded and to which computer on your network
6 You can either choose the service name from the drop down list, such as HTTP, FTP or POP3. The default ports will be forwarded by the router. HTTP port 80, FTP port 21 or POP3 port 110. You only need to type in the last number of your computer’s IP address where you want this service to be forwarded
7 Or alternatively you can do the fully manual port forwarding setup. Type the application name you want to assign for your reference. Fill in External port and Internal port. The external port from outside will be forwarded to the internal port of your computer. Choose TCP, UDP or Both from the dropdown list. And last type in the last number of your computer’s IP address where you want to forward the ports to
8 Click "Save Setting" button

9 Additionally you can forward port ranges if necessary. Click "Port Range Forwarding" tab in the menu
10 Specify the application name for your reference. And similarly to single port forwarding type in "Start – End port" values, select "TCP", "UDP" or "Both" and type in the last number of your computer’s IP address to forward this range to it
11 Click "Save Setting" button
Port forwarding is now configured for your computer!